I’ve been meaning to do some upskilling & refresh my knowledge in a few areas, so I decided to combine everything I wanted to learn and make a tutorial. I’ve documented my process & progress below – hopefully it helps someone!
I decided to do everything from scratch, as to get a better understanding on things. For previous WordPress theme development I’ve used XAMPP, but figured it’s time to get on the Docker train. I decided to create a WordPress & React application so I can manage the content of my website easily, while refreshing / upskilling in React. All while using TypeScript while I’m at it.
I’ve also been toying around with ChatGPT so a lot of the content in this blog post is as a result of querying ChatGPT with questions! Pretty neat!
If you want to view the source code for this project – it’s available here: https://github.com/Cactusman07/wordpress-react-theme-development
Docker
Docker allows us to set up ‘isolated containers’ that include entire development environments that you can run applications inside. Similar to setting up a VM (Virtual Machine), but without the weight that it would normally put on your system. This in practice means you can setup multiple environments on a ‘normal’ computer, and/or share containers for easier collaboration. My standard setup is a Windows machine – and it’s a fairly old one – so this is a good test to show what’s possible. I’ve included both Windows and Mac command steps below in case someone wants to follow along in both. Using Docker for local development is a slightly more involved process, but it’s still a pretty compelling option.
Prerequisites:
- Docker Desktop, Docker Compose (should have been included with Docker on Windows and macOS) & VSCode installed. I’m going to use GitHub (provide link), but you don’t have to. Ideally you should be comfortable using the command line, but don’t worry – you should just need to follow my instructions below.
- Download Docker find the version for you from their website (https://www.docker.com/), and run the installer. When it’s done, restart your PC (I’ll see you again shortly).
- Install VSCode if you don’t already have it installed.
- On Windows, open VSCode to the directory that you want to do the development work in (I.E: C:\Repositories\wordpress-theme-dev-setup) or something similar, and then using the terminal in VSCode, or external terminal if you prefer, type the below:
docker psYou should see something like this:

This is a list of containers that are running on your PC currently. There shouldn’t be any (unless you have already been using Docker and have an existing container), but anyway, let’s move on.
Open the terminal and enter the below command:
(For command line:) type nul> docker-compose.yml
(For PowerShell:) New-Item docker-compose.yml -type file
(For Linux/Mac:) touch docker-compose.yml
This will create a new docker-compose.yml file in the root directory of your project.
To create a WordPress development environment, you need to add the relative parameters to this YML file. In VSCode, open the docker-compose.yml file and add the below code to it:
(thanks https://developer.wordpress.com/2022/11/14/seetup-local-development-environment-for-wordpress/ for some of the setup – I’ve tweaked it a little bit).
version: "3.6"
services:

  db:
    image: mariadb:latest
    container_name: db
    volumes:
      - db_data:/var/lib/mysql
    environment:
      - MYSQL_ROOT_PASSWORD=password
      - MYSQL_USER=root
      - MYSQL_PASSWORD=password
      - MYSQL_DATABASE=wordpress
    restart: always

  wordpress:
    image: wordpress:latest
    container_name: wordpress
    volumes:
      - ./wordpress:/var/www/html
    environment:
      - WORDPRESS_DB_NAME=wordpress
      - WORDPRESS_TABLE_PREFIX=wp_
      - WORDPRESS_DB_HOST=db
      - WORDPRESS_DB_USER=root
      - WORDPRESS_DB_PASSWORD=password
    depends_on:
      - db
      - phpmyadmin
    restart: always
    ports:
      - 8080:80

  phpmyadmin:
    depends_on:
      - db
    image: phpmyadmin/phpmyadmin:latest
    container_name: phpmyadmin
    restart: always
    ports:
      - 8180:80
    environment:
      PMA_HOST: db
      MYSQL_ROOT_PASSWORD: password

  wordpress-cli:
    container_name: wordpress-cli
    depends_on:
      - db
      - wordpress
    image: wordpress:cli
    user: xfs
    environment:
      - WORDPRESS_DB_NAME=wordpress
      - WORDPRESS_DB_HOST=db
      - WORDPRESS_DB_USER=root
      - WORDPRESS_DB_PASSWORD=password
    volumes:
      - wp_data:/var/www/html

volumes:
  db_data:
  wp_data:
This YML file configuration defines three containers (well 4, but only three should run – the wordpress-cli container will exit quietly, as intended – this is only run when you actually need to use the WP-CLI), and binds the ‘wordpress’ container /var/www/html/ directory to a ‘wordpress/’ directory that Docker will create alongside your docker-compose.yml file. Save the file. You don’t need to edit the files within this WordPress directory – you can just leave them as is for now.
Most of the docker-compose.yml file should be self-explanatory – I’ve defined four services (wordpress, wordpress-cli, phpmyadmin and a database). The only thing I wanted to point out is the ‘volumes’ which you’ll need the correct parameters for. Volumes are one of the most important and beneficial parts of Docker Compose because they allow us to persist the data. If we needed to, we can stop and even fully remove our database container without worrying about data loss here.
Next, in your terminal (from within the folder where your docker-compose.yml file is located), use the command:
docker-compose up -dThis instructs docker-compose to create the three containers by downloading the base images from the Docker Hub before setting everything up and exposing your WordPress site and phpMyAdmin. The ‘-d’ flag is used to run the containers in ‘detached mode’ which means that it runs in the background and is not attached to the terminal. This basically means that you can use the terminal that you ran docker-compose up -d in to run other commands while the container is running. This setup might take a couple of minutes, but once the setup is complete, then you’ll be able to access your containers on the below addresses:
WordPress site will be located on localhost:8080
phpMyAdmin will be located on localhost:8180
This next step is apparently necessary due to how Docker handles file permissions and how the wordpress Docker image is constructed.
Open a new terminal window, navigate to your project directory by doing the following:
docker exec -it <container_id> /bin/bash And then run the following command:
chown -R {your-username}:{your-username} /var/www/html Or in our case:
chown -R www-data:www-data /var/www/html(in some cases it might be root: root but the above is what worked for me).
This will change the owner and group of all files and directories in the ‘/var/www/html’ directory to ‘root’ which is the user and group that the web server runs.
You can check file permissions in a docker container by using the command ‘ls -l’ – this will list out the contents of a directory and display their permissions. Anything that you see with ‘drwxr-xr-x’ means that you have read, write and execute permissions, the group has read, write and execute permissions and other users have read and execute permissions.
If later on, you find this still doesn’t help with permission issues. I.E: you try updating plugins, themes, etc and you get asked for FTP details (issue with Docker setup on WordPress), then find the wp-config.php file in your wordpress folder and add the below line to the bottom of the file, and then save it:
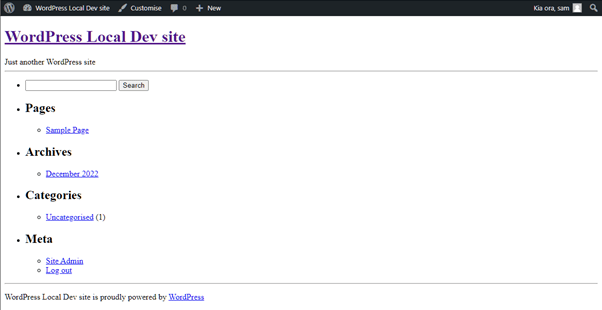
define('FS_METHOD','direct');Anyway, after you’ve done this, navigate to localhost:8080 in your browser and you should be greeted with the standard WordPress installation screen.
Once you’ve gone through that, you’ll also need to update the Permalink settings to be ‘Post name’ instead of the default settings for WordPress, otherwise later on the REST API won’t work.
Once up and running, you can update theme or plugins within the WordPress installation that is running in a Docker container by connecting to the container – use the ‘docker exec -it <container_id> /bin/bash’ command above. Once connected to the container you can use the WordPress CLI to update the theme or plugin (use wp –info command to check if the wp-cli package is installed correctly – it should be part of the docker-compose.yml file config).
You will need to use the below command, instead of wp –info:
docker-compose run wordpress-cli wp --info
OR
docker run --rm wordpress:cli wp --info
I prefer to use the second command – as it allows you to use the ‘–rm’ flag. This means that when the wp-cli container is run, and exits, it will close that container rather than leave it to persist, unused / exited. FYI – you can’t use the -d flag and the –rm flag together.
Once this is setup and the wp-cli package is installed, you can use the wp core update command to update the WordPress version, themes and plugins.
To update a plugin or theme, use the below commands (replace theme-name or plugin-name below):
wp plugin update plugin-name

wp theme update theme-name
Remember you’ll need to include the ‘docker run -rm wordpress:cli’ command before any wp command here. The same goes for installing new WordPress versions – once connected to the container, use the below command:
wp core updateAfter the update is complete, you’ll also need to run the WordPress database upgrade script to ensure the database is in sync with the updated WordPress version.
wp core update-dbAfter that, you’ll need to restart the container for the changes to take effect:
docker restart <container_id>FYI you can spin up and pull down as many Docker environments as you like, using the below commands:
docker-compose stop
docker-compose up -d
You can remove containers, by using the command below (see here – https://docs.docker.com/engine/reference/commandline/rm/):
docker rm [OPTIONS] CONTAINER [CONTAINER…]So in our case:
docker rm CONTAINER_IDThe container ID can be found by using the command from earlier:
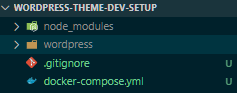
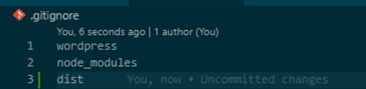
docker psAdd a .gitignore file to your project, and add the below code to it to prevent the wordpress folder from being included in your commits:
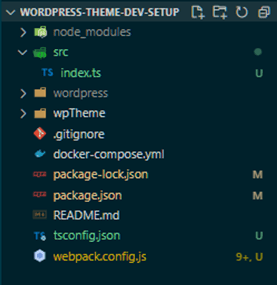
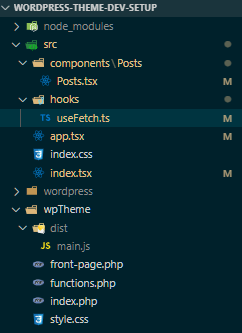
wordpressBy now your file structure should look something like this (ignore the node_modules folder in it – we’ll get to that later):
Next Step – get development environment updated to allow us to use React
A quick glance at React – some of the most significant features and functions:
JSX:
The main JavaScript syntax extension used in React is JSX. You can use it to embed HTML code in JavaScript objects and simplify complex code structures. It helps prevent cross-site scription by making it difficult for third parties to inject extra code through user input that isn’t explicitly written in the application.
Components:
React components are standalone, reusable pieces of code that make up the UI. These components work similarly to JavaScript functions – they accept props (arbitrary, read-only inputs), and returns an element to influence how the UI will look.
The two main types of components in React are class components and functional components. Class components use lifecycle hooks and API calls, while functional components simply return a rendered view without data requests or state management.
If you’re already familiar with react, then this probably isn’t necessary to go into more depth in. But for more information, please check out the React docs or find a good up-to-date React tutorial.
State:
State refers to the built-in object of React components. This is where you store property values of elements. If the state changes, the component re-renders. State management is the process of managing these application states and storing data in state management libraries. There are a handful of state management libraries out there that can you can call on for a smoother experience, like Redux or Recoil.
Why use React with WordPress?
Well, WordPress already in its core uses React. It uses it for the Gutenburg Editor, new widgets admin screen, and for the full site editing experience. It’s become the standard for building custom WordPress themes already!
Benefits (thanks ChatGPT):
- Improved performance. React is fast and efficient and allows you to build interactive and dynamic user interfaces that update efficiently which leads to a better development experience, along with a better user experience.
- Reusable components – easier to manage and maintain your codebase, and better reusability.
- Better separation of concerns – you can separate areas of your theme, such as data, presentation and behaviour which makes it easier to understand and maintain your theme and focus on one thing at a time.
- Improved development workflow – better experience building user interfaces, and better ability to debug your theme.
Overall, it can help you build more efficient, maintainable, and scalable themes that provide a better user & developer experience.
One way of building standalone React apps is by using the ‘create-react-app’ package, but we are building from scratch to get a better understanding, so we will continue with a manual setup using WebPack and Babel.
Webpack is a module builder, which allows you to import assets like images, JS files and stylesheets and process them into one or more bundles. Kind of like asset package management.
Babel is an ECMAScript transpiler that supports modern syntax extensions. This basically means you can use any ES version code without worrying about browser support. Babel will transpile new JS code into code that is suitable for older versions of browsers.
And because it’s always good to automate as much shit as possible, let’s try and automate our dev process. I have previously used Gulp.js for this (my original WP theme development setup used Gulp), but it looks like there’s a bit of a trend to use Webpack for these purposes instead, and the last stable build of Gulp was in 2019. Webpack has now grown, and when used in conjunction with its plugins, it’s now capable of replacing tools like Gulp. Webpack already provides options for minification and sourcemaps for your bundle, and it can be run as a middleware through a custom server (webpack-dev-server) which supports live reloading / hot module reloading. The basic tasks (that I can see) that webpack can’t perform are linting and unit-testing. This means that we can simply replace the leftover gulp functionality with things like NPM scripts directly, and avoid the additional overhead of adding it to the project.
Webpack on the whole can be a pain to configure though, so there is a level of unattractiveness there. I had a look at a few comparison articles (this was the best: https://www.toptal.com/front-end/webpack-browserify-gulp-which-is-better) – and came to the conclusion that Webpack + NPM scripts were the best way to go though, basically due to having to write less code.
Don’t get me wrong, I was a big fan of using gulp previously, but I had also ended up with massive files, dozens of Gulp plugins and had some fun struggles integrating it with Webpack & Babel after I updated to newer versions. The documentation wasn’t too crash-hot, and some plugins were deprecated (but still used in old tutorials), despite being requirements for existing Gulp plugins. Bleurgh! It quickly became pretty frustrating and disjointed.
Anyway, lets begin.
Prerequisites:
I’m assuming that you have Node / NPM installed already, along with an editor like VSCode and you are familiar with Node Package Manager.
In your project folder (not in the /wordpress folder), initialize a new npm project by running:
npm initThis will create a package.json file in your theme directory containing information about your project and it’s dependancies.
Install React and the react-dom library, which is used to render React components to the DOM & install Webpack. Run both:
npm i react react-dom

npm i webpack webpack-cli @types/react @types/react-dom --save-dev
We’re installing webpack, and webpack-cli (allowing us to run webpack on the command line).
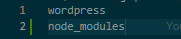
Don’t forget to update your .gitignore file to include node_modules too. It should now look like this:
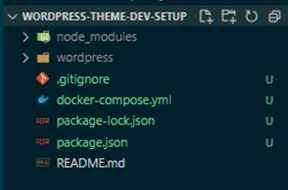
Your project directory should also now look something like this:
Now, using webpack… As of version 4 (if you have just installed Webpack then we should be on version 5 – you can check your version by using the command ‘webpack -v’ in the terminal), webpack doesn’t require any configuration, but most projects will require a more complex or individual setup – which is why webpack supports a config file. This is defined by creating a file called ‘webpack.config.js’ which sits in your root project directory. If a webpack.config.js is present, the ‘webpack’ command picks it up by default.
In your package.json file, update your scripts to the following:
"scripts": {
    "start": "docker-compose up -d",
    "stop": "docker stop db wordpress phpmyadmin wordpress-cli",
    "remove": "docker rm db wordpress phpmyadmin wordpress-cli",
    "test": "test"
  },
Now you can simply use the command: ‘npm run start’ instead of using ‘docker-compose up -d’ and we can add to this as we progress. You can also use ‘npm run stop’ to stop all of our containers using the above script, and ‘npm run remove’ to remove all our containers. And you can use Just leave the test command there for now – we can update that later too.
Install TypeScript:
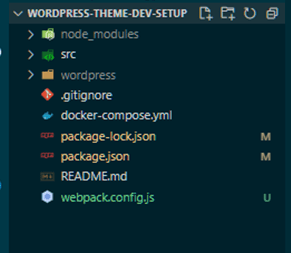
npm I typescript --save-devAdd a webpack.congif.js file to the root of the project directory, along with a ‘src’ folder which we will work out of. Your directory should look like this:
Open your package.json file and update “main” to point to where the src/index.tsx file will go:
"main": "./src/index.tsx",Now add an index.tsx file to the src folder. We will leave it empty for now.
Copy the below code into the webpack.config.js file:
const path = require('path');

module.exports = {
  mode: 'development',
  devtool:'inline-source-map',
  entry: './src/index.tsx',
  resolve: {
    extensions: ['.js', '.jsx', '.ts', '.tsx', '.json', '.css', '.scss'],
    modules: ['src', 'node_modules']
  },
  module: {
    rules: [
      {
        test:  /.(js|jsx)$/,
        exclude: /node_modules/,
        use: {
          loader: 'babel-loader',
        },
      },
      {
        test: /.(ts|tsx)$/,
        exclude: /node_modules/,
        loader: 'ts-loader',
      },
      {
        test: /\.css$/,
        use: [
          'style-loader',
          'css-loader'
        ]
      },
      {
        test: /\.scss$/,
        use: [
          {
            loader: 'style-loader'
          },
          {
            loader: 'css-modules-typescript-loader'
          },
          {
            loader: 'css-loader',
            options: {
              modules: true
            }
          },
          {
            loader: 'sass-loader'
          }
        ]
      },
      {
        test: /\.(png|jpg|jpeg|gif|svg)$/,
        use: 'url-loader'
      },
      {
        test: /\.(woff2|woff|ttf|eot|svg)(\?v=[a-z0-9]\.[a-z0-9]\.[a-z0-9])?$/,
        use: 'url-loader'
      }
    ]
  },
  plugins: [

  ],
  output: {
    filename: 'main.js',
    path: path.resolve(__dirname, './dist')
  }
};
We will need to add the necessary dependencies also, so use the below command to install them:
npm i css-loader css-modules-typescript-loader file-loader node-sass sass-loader style-loader ts-loader url-loader babel-loader --save-devAdd a tsconfig.json file to the root directory, and copy the below into it:
{
  "compilerOptions": {
      "module": "commonjs",
      "moduleResolution": "node",
      "pretty": true,
	"jsx": "react",
	"esModuleInterop": true,
      "outDir": "./dist",
      "sourceMap": true,
      "baseUrl": "./src"
  },
  "include": [
      "src/**/*.tsx"
  ],
  "exclude": [
      "node_modules"
  ]
}
Your project directory should look something like this:
Add the “webpack” command to your scripts within the package.json file:
"build": "webpack",So this should look like this:
"scripts": {
    "start": "docker-compose up -d",
    "stop": "docker stop db wordpress phpmyadmin wordpress-cli",
    "remove": "docker rm db wordpress phpmyadmin wordpress-cli",
    "build": "webpack",
    "test": "test"
  },
Now we can run npm run build instead. After running this, you should see a main.js file being output in the /dist folder like below:

As this will add a dist folder & create our theme files within it, we should exclude this from our repository, so add an exclusion to our .gitignore file here too.
Next, we update the volumes in our WordPress service within the docker-compose file so that the theme directory on the WordPress server is mapped to our local wpTheme folder within the directory. Add the bottom line from the below to our docker-compose.yml file.
  wordpress:
    image: wordpress:latest
    container_name: wordpress
    volumes:
      - ./wordpress:/var/www/html
      - ./wpTheme:/var/www/html/wp-content/themes/[theme_name]
For [theme-name] I’ve used ‘new-theme’ – but you can call your theme whatever you want.
And in our webpack.config.js file, let’s add the BrowserSync plugin. First, install it using the below command:
npm i browser-sync-webpack-plugin --save-devAnd update our webpack.config.js file as per below:
const path = require('path');
const BrowserSyncPlugin = require('browser-sync-webpack-plugin'); //add this to the top
And where we have the empty plugins section below, update it to look like this:
plugins: [
    new BrowserSyncPlugin({
        proxy: {
            target: 'http://localhost:8080'
        },
        files:['**/*.php'],
        cors: true,
        reloadDelay: 0,
        open: false
    }),
  ],
And lastly, add a .babelrc file to your project at the root level and add the below code to it:
{
  "presets": ["@babel/env", "@babel/react"]
}
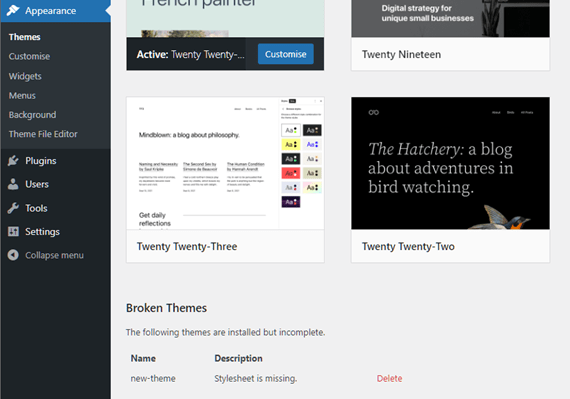
Now restart your docker containers, and run ‘npm run start’ again – your containers should spin up, with the theme mapping. Check out the ‘themes’ section in your local wordpress install – http://localhost:8080/wp-admin/themes.php
You should see the below – under ‘Broken Themes’ – because we haven’t started adding anything to the theme just yet.
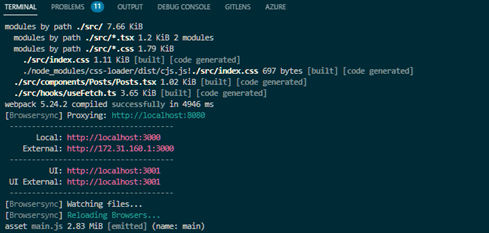
Now use the command ‘webpack –watch’ and you should see the console open and run webpack. You should see something like this:
And you can check http://localhost:3000/ – it should be identical to http://localhost:8080/ – which means we are on the right track. Let’s add this command to our package.json scripts section, and update our start script – as per below:
"scripts": {
    "start": "docker-compose up -d && npm run dev", // add && npm run dev
    "stop": "docker stop db wordpress phpmyadmin wordpress-cli",
    "remove": "docker rm db wordpress phpmyadmin wordpress-cli",
    "build": "webpack",
    "dev": "webpack --watch", //add here
    "test": "test"
  },
Now all we have to do is type ‘npm run start’ and it will spin up our docker image, and start webpack for us.
In case you were wondering what the difference between Webpack & Webpack Dev Server is, Webpack is a static module bundler for modern JS applications. It’s a tool that takes your JS code, along with its dependencies and creates one or more bundles that can be included in a web page. Whereas Webpack Dev Server is a development server that provides live reloading and hot module replacement (HMR) for webpack-built applications. It’s not intended for production use, which is why we have the build script set to ‘webpack’ – this dist folder is where you would find your complete theme once ready for production. One key difference between the two is that Webpack is a tool that runs on your PC, while Webpack Dev Server is a development server that runs in a node.js environment and serves bundles to your browser.
If you want the browser to open a new tab to the correct localhost URL when you run your npm run start command, then add the below to your script:
Windows:
"dev": "start http://localhost:3000/ & webpack --watch",Mac:
"dev": "webpack --watch & open http://localhost:3000/",For Browsersync information – you can checkout http://localhost:3001/ – this will give you a local URL, and info on what URL it is proxying (http://localhost:8080/).
We could alternatively configure this in the webpack.config.js file – by adding the below:
devServer: {
      ...
      open: true
    },
Open: true tells dev-server to open the browser after the server has been started. Either is fine. But I’m using package.json scripts as I’m proxying via port 3000, and open: true will open port 8080.
So lets do a quick recap – so far we’ve setup docker & WordPress with some fun help from ChatGPT along the way. We added webpack to the dev environment so that we can do theme development within the container utilising reloading and hot module replacement. And we set everything up so that it’s a single command to spin up.
Hopefully that’s been easy enough to follow… Next step is scaffolding our theme out. I’m going to keep this basic AF, as I want this to be a base for my theme development moving forwards and I want to keep it as blank-slate as possible.
WordPress
All a WordPress theme needs is only two files – style.css & index.php. Add these to your wpTheme folder and add the below (or whatever content you wish to put in here):
style.css:
/*
Theme Name: New Theme
Author: Sam Muir
Description: A setup using Docker, Webpack & React for theme development
Version: 0.0.1
Tags: React, WordPress, Docker, Webpack, Theme Development
*/
You can update this with whatever your name is, the description of the theme and the theme name. It’s pretty straightforward – simply just a comment for WordPress to understand what the theme is for.
And index.php:
<?php get_header(); ?>
  <div>
    <div class="blog-main">
      <?php get_template_part( 'content', get_post_format() ); ?>
    </div> <!-- /.blog-main -->
    <?php get_sidebar(); ?>
  </div>
<?php get_footer(); ?>
Now, when you go to the themes in your WordPress install, you should see your theme!
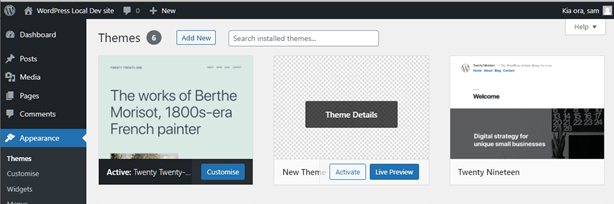
Activate this, and return to your site. It should be pretty bare-bones, with no CSS, as per below. And when you make any changes to the php files, it will now trigger a browser reload, so you’re good to go there.
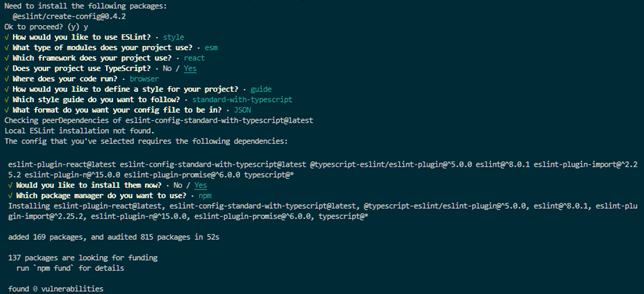
Before we continue into the theme development, I wanted to go through linting using eslint – I think it’s a pretty important tool to use for any development environment for consistent standards across development teams, fixing problems, and cleaning code. Install eslint using the below command and follow any prompts:
npm init @eslint/configI used the below parameters for this project:
This will add all the relevant eslint dependencies to your dev dependencies inside your package.json file, and will create a .eslintrc.json file in your projects root directory.
Open the newly created .eslintrc.json file and inspect it. You’ll see a pretty basic file, with a couple of extensions in it – as below:
    "extends": [
        "plugin:react/recommended",
        "standard-with-typescript"
    ],
Just one change we need to make to this file – under the parserOptions, add the last line (“project”: [“./tsconfig.json”]:
"parserOptions": {
        "ecmaVersion": "latest",
        "sourceType": "module",
        "project": ["./tsconfig.json"]
    },
We also need to update our webpack.config file – adding the below to the plugin’s section:
plugins: [
    new BrowserSyncPlugin({
      ...
      files: [
        './wpTheme/*.php',
        './src/*.ts',
        './src/*.tsx'
      ],
This was the solution will track typescript files.
After this is done, we can close this and continue with our development – there should be a lot of tips & fixes now shown which will help with consistency in code formatting of this project. If you want to know more about rules that eslint can use, check out their documentation here: https://eslint.org/docs/latest/rules/
The React Application
By decoupling WordPress from it’s PHP generated frontend view, it gives us some more flexibility. It moves away from the traditional monolithic WP web applications, and allows us to use WordPress as more of a ‘headless’ CMS. Thanks (https://snipcart.com/blog/reactjs-wordpress-rest-api-example) for the image below:
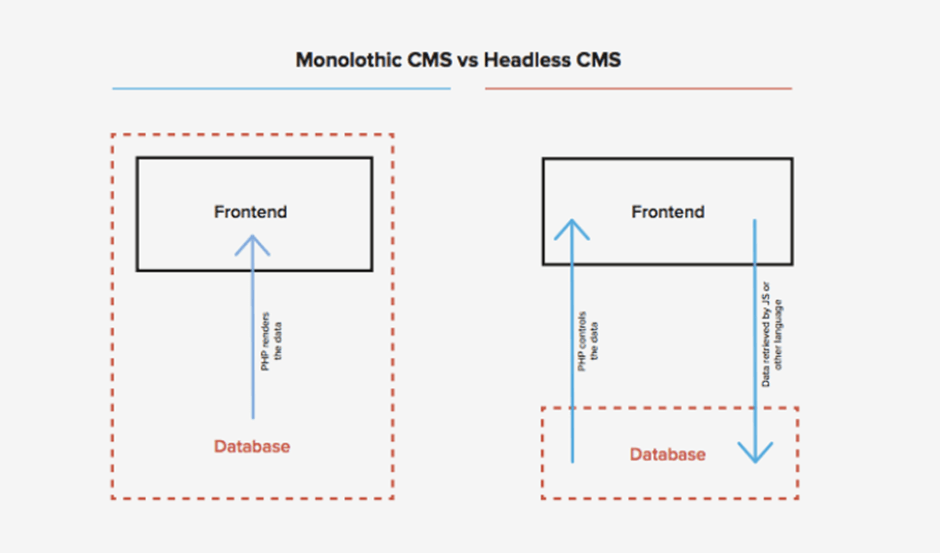
You can still use the WordPress interface to easily manage content, and then have a React application doing the frontend rendering – pretty neat! So lets get on with the React development part.
Now our WordPress website is up and running, we’re going to scaffold our React application. Under the /src folder, in the index.tsx file copy in the below code:
import React from 'react';
import ReactDOM from 'react-dom/client';
import './index.css';
import App from 'app';

const root = ReactDOM.createRoot(document.getElementById('root'));

root.render(
  <React.StrictMode>
    <App />
  </React.StrictMode>
);
Next, create an index.css file in the same directory – just leave this blank. Also create a file called ‘app.tsx’ in the same directory.
Typically, if you’ve worked on React project before you might have seen the below instead of the longer declaration above:
ReactDOM.render(<App />, document.getElementById('root'));They achieve the same, however the method we are using is preferred as the single line method is considered a disadvantage. The older way of rendering forces React developers to move & declare the root variable throughout other files wherever they want to use the call ‘render’. This is an unnecessary dependency, so the way we are doing it is preferred.
StrictMode is a tool for highlighting potential problems in an application – we’re just using it here to help debug issues. StrictMode checks are run in development mode only and don’t impact production builds.
If you aren’t familiar with TypeScript – the rest of the tutorial will be writing code utilising TypeScript, so I would recommend getting familiar with it here (https://www.typescriptlang.org/docs/).
TypeScript offers variable and bug checks for your code – it checks the data type assigned to statically-defined vairables, reducing the possibility of assigning the wrong type to our variables. It also does compilation-time checks that help flag errors such as syntax errors. The key thing to remember about TypeScript is that is statically-typed script. Static language variables are type-checked.
One advantage of TypeScript is that it allows you to define complex type definitions in the form of interfaces. This is helpful when you have complex types that you want to use in your application (think objects that contain other properties). This results in strict checks, which reduce the number of possible bugs. The use of .tsx files allow for JSX inside TypeScript files. Having .tsx files allow JS bundlers like Webpack to run different plugins for .tsx files, and means that test-runners can run different test environments for .tsx files.
What’s the difference between .ts & .tsx? Well, the key difference is to use .tsx file extensions when you want to include JSX syntax. If you don’t have JSX syntax – say you’re just creating functions, classes, etc, then you can just use .ts file extension.
In app.tsx, copy in the below code:
import React from 'react';

function App() {

  return(
    <h1>Hello</h1>
  );
}

export default App;
Now back in our wpTheme folder, we are going to create a template for the front page of our theme only. In the wpTheme folder, create a front-page.php file. This will be shown as the front page of your theme. For more information on theme template hierarchy – please check out the WordPress developer docs here (https://developer.wordpress.org/themes/basics/template-hierarchy/#the-template-file-hierarchy). If front-page.php exists, it will override the home.php template (which overrides the index.php for the front/home page of the theme). Just out of habit, I usually add a 404.php file too so I can customize my 404 pages.
See the visual hierarchy here:
https://developer.wordpress.org/files/2014/10/Screenshot-2019-01-23-00.20.04.png
Open front-page.php and copy in the below code – this is the initial template code for our front page.
<?php
/**
 * Template Name: Front Page Template
 *
 * Description: A template for the front-page of your website
 * for this theme.
 *
 */
?>
<!DOCTYPE html>
<html lang='<?php language_attributes(); ?>'>
  <head>
    <meta http-equiv='content-type' content='text/html;charset=utf-8' charset='utf-8'/>
    <meta name='viewport' content='width=device-width, initial-scale=1'>
    <title><?php wp_title('|', true, 'right'); ?></title>

    <?php wp_head(); ?>
  </head>

  <body <?php body_class(); ?>>
    <noscript>You need to enable JavaScript to run this app.</noscript>

    <div id="root"></div>

    <?php wp_footer(); ?>
  </body>
</html>
Next, in the same directory create a functions.php file. This is automatically loaded when the theme is active and will hold our custom functions to be used later. Initially though, we will just be using it to enqueue CSS & JS bundle files that are generated by webpack when we build the React / WP theme. Copy the below code into the functions.php fle:
<?php
  function theme_enqueue_scripts()
  {

    $version = '1.1.0';

    wp_enqueue_script('theme-script', get_stylesheet_directory_uri() . '/dist/main.js', array('jquery'), $version, true );
    wp_enqueue_style('theme-style', get_stylesheet_directory_uri() . '/dist/main.css', array(), $version);

    $config = array(
      // Add theme variables later that are needed in react
    );

    wp_localize_script('theme', 'wp_config', $config);
  }

  add_action('wp_enqueue_scripts', 'theme_enqueue_scripts');

?>
Now jump back into WordPress and update the Reading Settings for your site (under settings -> Reading):
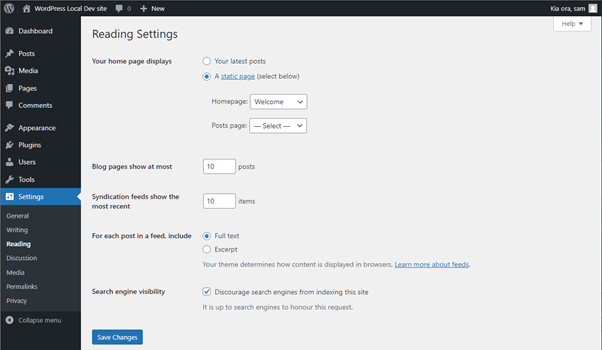
You want to make your home page display a static page. I created a new blank page called “welcome” which I then set to be the front page. This will be utilised later on.
And lastly, we need to make sure that we update our webpack.config.js file to cater for development builds. The /dist output folder we have here that is also in our .gitignore file should ideally be used for generating a production build. Let’s make the React app build into the wpTheme folder so our functions file can enqueue it.
Firstly open your webpack.config.js file, and update the line below (containing mode):
module.exports = {
  mode: !!env.production ? 'production' : 'development', // update this line
  devtool: 'inline-source-map',
  entry: './src/index.tsx',
Let’s also update the devtool if it’s not production:
devtool: !!env.production ? 'hidden-source-map' : 'inline-source-map',And the output, as follows:
    output: {
      filename: 'main.js',
      path: env.production ? path.resolve(__dirname, './dist') : path.resolve(__dirname, './wpTheme/dist')
    }
And then in our package.json file, we should update our scripts, creating a ‘build-dev’ and ‘build-prod’ script, each with the relevant –env flag added:
  "scripts": {
    "start": " docker-compose up -d && npm run build-dev && npm run dev",
    "stop": "docker stop db wordpress phpmyadmin wordpress-cli",
    "remove": "docker rm db wordpress phpmyadmin wordpress-cli",
    "build-prod": "webpack --env production",
    "build-dev": "webpack --env development --watch",
    "dev": "start http://localhost:3000/",
    "test": "test"
  },
And lastly, back in our webpack.config.js file we want to be able to pass the env variable through, so we update the code as follows, making sure that everything inside module.exports is wrapped in the ‘return’ statement:
module.exports = (env) => {

  return{
	...
  }
If everything works as is now, we should be able to run ‘npm run build-dev’ and a dist folder with main.js will be built inside of the wpTheme folder, and back on our webpage, we should see a simple page with “Hello” across it – this shows that our React App is being served by the front end page of our WordPress Application.
The only other thing I want to do here is output management. If your application grows, and / or you start outputting multiple bundles, it will be difficult to keep on top of managing things. There’s far more information on this in the webpack documentation here (https://webpack.js.org/guides/output-management/), but for now the only thing I wanted to add was cleaning the dist folder. To do this, we simply add the below code to our webpack.config.js file:
    output: {
      filename: 'main.js',
      path: !!env.production ? path.resolve(__dirname, './dist') : path.resolve(__dirname, './wpTheme/dist'),
      clean: true  // add this line
    }
By this stage, your files should look similar to the below (I’ve added a couple of things and skipped over them as I felt like they were outside the scope of what I’m going over here, but feel free to copy if you desire):
Webpack.config.js:
const path = require('path')
const BrowserSyncPlugin = require('browser-sync-webpack-plugin')

module.exports = (env) => {
  console.log(env);

  return{
    devtool: !!env.production ? 'hidden-source-map' : 'inline-source-map',
    mode: !!env.production ? 'production' : 'development',
    entry: path.resolve(__dirname, './src/index.tsx'),
    resolve: {
      extensions: ['.js', '.jsx', '.ts', '.tsx', '.json', '.css', '.scss'],
      modules: ['src', 'node_modules'] // Assuming that your files are inside the src dir
    },
    module: {
      rules: [
        {
          test: /.(js|jsx)$/,
          exclude: /node_modules/,
          use: {
            loader: 'babel-loader'
          }
        },
        {
          test: /.(ts|tsx)$/,
          exclude: /node_modules/,
          loader: 'ts-loader'
        },
        {
          test: /\.css$/,
          use: ['style-loader', 'css-loader']
        },
        {
          test: /\.scss$/,
          use: [
            {
              loader: 'style-loader'
            },
            {
              loader: 'css-modules-typescript-loader'
            },
            {
              loader: 'css-loader',
              options: {
                modules: true
              }
            },
            {
              loader: 'sass-loader'
            }
          ]
        },
        {
          test: /\.(png|jpg|jpeg|gif|svg)$/,
          use: 'url-loader'
        },
        {
          test: /\.(woff2|woff|ttf|eot|svg)(\?v=[a-z0-9]\.[a-z0-9]\.[a-z0-9])?$/,
          use: 'url-loader'
        }
      ]
    },
    plugins: [
      new BrowserSyncPlugin({
        proxy: {
          target: 'http://localhost:8080'
        },
        files: [
          './wpTheme/**/*.php',
          './src/**/*.ts',
          './src/**/*.tsx'
        ],
        cors: true,
        reloadDelay: 0,
        open: false
      })
    ],
    output: {
      filename: 'main.js',
      path: !!env.production ? path.resolve(__dirname, './dist') : path.resolve(__dirname, './wpTheme/dist'),
      clean: true
    }
  }
}
Package.json:
The URL’s within this won’t match what you have, as they are examples to my repository. If you have created a repository for your project, then you should have your own repo links in here.
{
  "name": "wordpress-portfolio-local",
  "version": "1.0.0",
  "description": "A tutorial for wordpress theme development, using Docker, React, Webpack & more - built from scratch. ",
  "main": "./src/index.js",
  "scripts": {
    "start": "docker-compose up -d && npm run build-dev && npm run dev",
    "stop": "docker stop db wordpress phpmyadmin wordpress-cli",
    "remove": "docker rm db wordpress phpmyadmin wordpress-cli",
    "build-prod": "webpack --env production",
    "build-dev": "webpack --env development --watch",
    "dev": "start http://localhost:3000/ ",
    "test": "test"
  },
  "repository": {
    "type": "git",
    "url": "git+https://github.com/Cactusman07/wordpress-react-theme-development.git"
  },
  "keywords": [
    "wordpress",
    "react",
    "docker",
    "theme",
    "development"
  ],
  "browserslist": {
    "production": [
      ">0.2%",
      "not dead",
      "not op_mini all"
    ],
    "development": [
      "last 1 chrome version",
      "last 1 firefox version",
      "last 1 safari version"
    ]
  },
  "author": "Cactusman07",
  "license": "ISC",
  "bugs": {
    "url": "https://github.com/Cactusman07/wordpress-react-theme-development/issues"
  },
  "homepage": "https://github.com/Cactusman07/wordpress-react-theme-development#readme",
  "dependencies": {
    "react": "^18.2.0",
    "react-dom": "^18.2.0"
  },
  "devDependencies": {
    "@types/react": "^18.0.26",
    "@typescript-eslint/eslint-plugin": "^5.48.0",
    "babel-loader": "^9.1.2",
    "browser-sync-webpack-plugin": "^2.3.0",
    "css-loader": "^6.7.3",
    "css-modules-typescript-loader": "^4.0.1",
    "eslint": "^8.31.0",
    "eslint-config-standard-with-typescript": "^26.0.0",
    "eslint-plugin-import": "^2.26.0",
    "eslint-plugin-n": "^15.6.0",
    "eslint-plugin-promise": "^6.1.1",
    "eslint-plugin-react": "^7.31.11",
    "file-loader": "^6.2.0",
    "node-sass": "^8.0.0",
    "sass-loader": "^13.2.0",
    "style-loader": "^3.3.1",
    "ts-loader": "^9.4.2",
    "typescript": "^4.9.4",
    "url-loader": "^4.1.1",
    "webpack": "^5.75.0",
    "webpack-cli": "^5.0.1"
  }
}
Tsconfig.json:
{
  "compilerOptions": {
      "module": "commonjs",
      "moduleResolution": "node",
      "pretty": true,
      "jsx": "react",
      "outDir": "./dist",
      "sourceMap": true,
      "esModuleInterop": true,
      "baseUrl": "./src"
  },
  "include": [
      "src/**/*.tsx"
    ],
  "exclude": [
      "node_modules"
  ]
}
.babelrc:
{
  "presets": ["@babel/env", "@babel/react"]
}
.eslintrc.json:
{
    "env": {
        "browser": true,
        "es2021": true
    },
    "extends": [
        "plugin:react/recommended",
        "standard-with-typescript"
    ],
    "overrides": [
    ],
    "parserOptions": {
        "ecmaVersion": "latest",
        "sourceType": "module",
        "project": ["./tsconfig.json"]
    },
    "plugins": [
        "react"
    ],
    "rules": {
        "@typescript-eslint/prefer-nullish-coalescing": "no"
    }
}
Now, moving on let’s get more into the React side of things. We’re going to create a custom post type in WordPress, add some content to it, and then pull these ‘posts’ through onto the front page using a ‘Posts’ component to query the custom posts data. In the /src folder, create another folder called ‘components’ and then within that folder, create another folder called ‘Posts’
To query the posts data, create a Posts.tsx file, add the following code to build the component:
import React, { useEffect, useState } from 'react';

export default function Posts(){
  const [posts, setPosts] = useState([]);
  useEffect(() => {
    async function loadPosts() {
      const response = await fetch('/wp-json/wp/v2/posts');
      if (!response.ok) {
        // Something failed
        return;
      }

      const posts = await response.json();
      setPosts(posts);
    }

    loadPosts();
  }, [])

  return (
    <React.Fragment>
      <div id="frontPagePosts">
        <h1>Posts</h1>
        {!!posts ? posts.map((post: { title: { rendered: string; }; }, index: React.Key) => (
          <div className="post" key={index} dangerouslySetInnerHTML={{__html: post.title.rendered}} />
        )) : <p>Loading...</p> }
      </div>
    </React.Fragment>
  );
}
This uses useEffect & useState, two of React’s Hooks. Firstly useState is used to declare the array of posts and provide a callback to update it – then useEffect allows running the fetch code when the component is mounted.
Finally, to render a list of posts, you can ‘map’ over the posts array and return html or components for each one of them.
A couple of things to be aware of when using useEffect – the callback cannot return a promise, so an async function cannot be passed directly to useEffect. And an empty array must be passed to useEffect to make it run only once (tells React that useEffect doesn’t depend on any value).
I’ve also added a check on the posts variable, so that we don’t get errors thrown if the fetch call fails – the component simply just returns ‘Loading…’ while waiting for the posts to be returned.
You can actually simplify this further by extracting the hooks into a separate function. Under the src folder, create a new folder called ‘hooks’ and then create a file called ‘useFetch.tsx’
In the useFetch.tsx file copy in the below code:
import { useEffect, useState } from 'react';

export default function useFetch(url: string) {
    const [data, setData] = useState(null);

    useEffect(() => {
        async function loadPosts() {
            const response = await fetch(url);
            if(!response.ok) {
                // Something failed
                return;
            }

            const posts = await response.json();
            setData(posts);
        }

        loadPosts();
    }, [url]);
    return data;
}
Now update our Posts.tsx component to be as per the below:
import React from 'react';
import useFetch from '../../hooks/useFetch';

export default function Posts(){
  const posts = useFetch('/wp-json/wp/v2/posts');

  return (
    <React.Fragment>
      <div id="frontPagePosts">
        <h1>Posts</h1>
        {!!posts ? posts.map((post, index) => (
          <div className="post" key={index} dangerouslySetInnerHTML={{__html: post.title.rendered}} />
        )) : <p>Loading...</p> }
      </div>
    </React.Fragment>
  );
}
This is an example of creating a custom React Hook, that can be reused throughout your application now.
Now let’s get our posts into the front page of the app.
Run the command below:
npm i --save-dev @types/react-domNow update our app.tsx file to read as per below:
import React from 'react';
import Posts from './components/Posts/Posts';

const App = () => {
  return <Posts />;
}

export default App;
React 18 shipped earlier in 2022, and ReactDOM.render has been deprecated, so what you might have seen previously has been replaced with the below ‘createRoot’ function. Update our index.tsx file to read as per below:
import React from 'react';
import { createRoot } from 'react-dom/client'; // update import
import './index.css';
import App from './app';

const root = createRoot(document.getElementById('root') as HTMLElement);

root.render(
  <React.StrictMode>
    <App />
  </React.StrictMode>
);
Your project should look something like this:
And React App like this:
index.tsx:
import React from 'react';
import { createRoot } from 'react-dom/client';
import './index.css';
import App from './app';

const root = createRoot(document.getElementById('root') as HTMLElement);

root.render(
  <React.StrictMode>
    <App />
  </React.StrictMode>
);
app.tsx:
import React from 'react';
import Posts from './components/Posts/Posts';

const App = () => {
  return <Posts />;
}

export default App;
Posts.tsx:
import React from 'react';
import useFetch from '../../hooks/useFetch';

export default function Posts(){
  const posts = useFetch('wp-json/wp/v2/posts');

  return (
    <React.Fragment>
      <div id="frontPagePosts">
        <h1>Posts</h1>
        {!!posts ? posts.map((post, index) => (
          <div className="post" key={index} dangerouslySetInnerHTML={{__html: post.title.rendered}} />
        )) : <p>Loading...</p> }
      </div>
    </React.Fragment>
  );
}
useFetch.ts:
import { useEffect, useState } from 'react';

export default function useFetch(url: string) {
    const [data, setData] = useState(null);

    useEffect(() => {
        async function loadPosts() {
            const response = await fetch(url);
            if(!response.ok) {
                // Something failed
                return;
            }

            const posts = await response.json();
            setData(posts);
        }

        loadPosts();
    }, [url]);
    return data;
}
Now if you go to your home page – you should see something like this (assuming you have kept the default WordPress post of “Hello World!”:

If you jump back into our Posts.tsx file, you might notice that TypeScript is throwing a ‘problem’ – your app will still compile but it’s recommending that posts and index are implicitly implied to have ‘any’ type. Let’s update these to make them more type-script. In the line of the code where the map function is declared – lets update it match the below:
    <React.Fragment>
      <div id="frontPagePosts">
        <h1>Posts</h1>
        {!!posts ? posts.map((post: { title: { rendered: string; }; }, index: React.Key) => ( // Added type declarations for ‘rendered’ and for the index
          <div className="post" key={index} dangerouslySetInnerHTML={{__html: post.title.rendered}} />
        )) : null }
      </div>
    </React.Fragment>
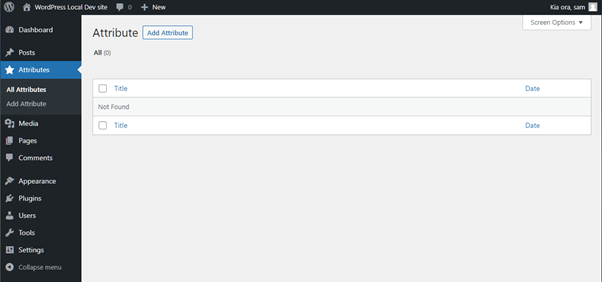
Now, switching back to the WordPress side of things again, lets add a Custom Post Type to our theme, add some content to the site, and then render these via our react App. First, lets jump back to our functions.php file.
We’re going to add the below code to the bottom of this file, before the closing ?> php tag:
    /* Add custom post type 'Attributes' to Theme */
    function create_postTypeAttributes() {

      $labels = array(
        'name'                => _x( 'Attribute', 'Post Type General Name', "New Theme"),
        'singular name'       => _x( 'Attribute', 'Singular Name', "New Theme"),
        'menu_name'           => __( 'Attributes', "New Theme"),
        'all_items'           => __( 'All Attributes', "New Theme" ),
        'view_item'           => __( 'View Attributes', "New Theme" ),
        'add_new_item'        => __( 'Add New Attribute', "New Theme" ),
        'add_new'             => __( 'Add Attribute', "New Theme" ),
        'edit_item'           => __( 'Edit Attribute', "New Theme" ),
        'update_item'         => __( 'Update Attributes', "New Theme" ),
        'search_items'        => __( 'Search for Attribute', "New Theme" ),
        'not_found'           => __( 'Not Found', "New Theme" ),
        'not_found_in_trash'  => __( 'Not found in Trash', "New Theme" ),
      );

      $args = array(
        'label'               => __('Attributes', "New Theme"),
        'description'         => __('A list of Attributes.', "New Theme"),
        'labels'              => $labels,
        'supports'            => array( 'title' ),
        'hierarchical'        => true,
        'public'              => true,
        'publicly_queryable'  => true,
        'query_var'           => true,
        'show_in_rest'        => true,
        'rest_base'           => 'attributes',
        'rest_controller_class' => 'WP_REST_Posts_Controller',
        'show_ui'             => true,
        'show_in_menu'        => true,
        'show_in_nav_menus'   => true,
        'show_in_admin_bar'   => true,
        'menu_position'       => 5,
        'can_export'          => true,
        'has_archive'         => false,
        'exclude_from_search' => false,
        'publicly_queryable'  => true,
        'capability_type'     => 'page',
        'menu_icon'           => 'dashicons-star-filled',
      );
      register_post_type('Attributes', $args );
    }
    add_action('init', 'create_postTypeAttributes', 0 );
There’s a lot to go over here – so let’s try explain it. Firstly we’re creating the array of labels that will be used throughout the site – pretty self-explanatory I think. Replace ‘New Theme’ with your own theme name. $args takes an array of properties that can be updated for this particular custom post type, which we pass labels into. The most important things here are:
‘supports’ – most normal post types have support for the following:
'title', 'editor', 'excerpt', 'author', 'thumbnail' However, I’m just trying to keep it simple, so I’ve just added support for a title – that’s it at the moment.
‘show_in_rest’ – set to true, as we want to see our post types in the WordPress rest API.
And ‘show_in_menu’ & ‘show_in_nav_menu’ as we want to see the post types in the WordPress admin UI.
For more information about all available options for custom post type arg parameters – view the developer docs here: https://developer.wordpress.org/reference/functions/register_post_type/
In your WordPress dashboard, you should now see Attributes in the left hand menu – as below:
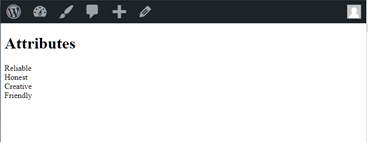
Add some attributes to the list – just make a few up and save them. After you’ve done this. Update the Posts.tsx component to be as per below:
export default function Posts(){
  const posts = useFetch('/wp-json/wp/v2/attributes'); // update URL for fetch to use

  return (
    <React.Fragment>
      <div id="frontPagePosts">
        <h1>Attributes</h1> // You don’t have to update the title, but I did
        {!!posts ? posts.map((post: { title: { rendered: string; }; }, index: React.Key) => (
          <div className="post" key={index} dangerouslySetInnerHTML={{__html: post.title.rendered}} />
        )) : <p>Loading...</p> }
      </div>
    </React.Fragment>
  );
}
Save, and watch your front page reload as follows:
You’ll notice that in WordPress the post type structure (object-wise) is always in the same json format, so you shouldn’t have too many issues with adding custom post types, or querying pages instead of posts, and retuning the relevant data that you need to scaffold your app. You can use something like PostMan to play around with querying the WordPress REST API on your localhost site if you ever get stuck with API calls.
Also lets make use of TypeScript in our application and tidy things up a bit. In our Posts.tsx component, we’re going to update it as per below:
import React from 'react';
import useFetchData from '../../hooks/useFetch';

const Posts = () => {
  const { data, isLoading } = useFetchData('/wp-json/wp/v2/attributes');

  return (
    <React.Fragment>
      <div id="frontPagePosts">
        <h1>Attributes</h1>
        {isLoading ? (
          <p>Loading...</p>
        ) : (
          data?.map((post, index) => (
            <div className="post" key={index} dangerouslySetInnerHTML={{__html: post.title.rendered}} />
          ))
        )}
      </div>
    </React.Fragment>
  );
};

export default Posts;
We’ve taken out the logic, and created an ‘isLoading’ variable to be passed in when the data is fetched. An in our useFetch.tsx file, we are going to update it to the below:
import { useEffect, useState } from 'react';

interface Post {
    title: {
      rendered: string;
    };
}

  interface UseFetchDataReturn {
    data: Post[] | null;
    isLoading: boolean;
}

export default function useFetch(url: string): UseFetchDataReturn {
    const [data, setData] = useState<Post[] | null>(null);
    const [isLoading, setIsLoading] = useState(false);

    useEffect(() => {
      setIsLoading(true);
      async function fetchData() {
        const res = await fetch(url);
        const data = await res.json();
        setData(data);
        setIsLoading(false);
      }
      fetchData();
    }, [url]);

    return { data, isLoading };
};
Here we’ve added two interfaces – one called ‘Post’ where we define the parameters for the Post (at the moment we only need the rendered title of the post), and we create an interface for the useFetchDataReturn. This will contain the definition of the format of the data that is returned in useFetch – you can see useFetch inherits from the UseFetchDataReturn interface. All of our WordPress posts types will be in this format, but we can extend this hook and add optional parameters to the interfaces as our needs increase.
Last few things we have to do now is to add a bit of style to the app (I’m going to look at tailwind as I haven’t used it yet) and extend our application a bit more (some more complexity introduced in components, and show how to utilise TypeScript more. I’ll also add some tests in and I’ve been wanting to explore and use GraphQL – so I’ll do that also.
TailWind
From what I’ve read about Tailwind, it’s a utility-first CSS framework which makes it very easy to apply great styling to your React applications by choosing from the framework’s ready-made CSS classes.
In your command line tool run:
npm i -D tailwindcss postcss autoprefixerWe are installing Tailwind CSS as a PostCSS plugin so that we can integrate it with our webpack configuration (see Tailwind documentation here: https://tailwindcss.com/docs/installation/using-postcss). Yes, -D is short for –save-dev, which we were using earlier. Then use the below command:
npx tailwindcss initThis will generate a tailwind.config.js file in your root directory. Also create a postcss.config.js file. Open the postcss.config.js file and add the below to the file:
module.exports = {
  plugins: {
    tailwindcss: {},
    autoprefixer: {},
  }
}
Back in your tailwind.config.js file. configure your template paths by adding the below to the ‘content’ section of the config file:
/** @type {import('tailwindcss').Config} */
module.exports = {
  content: ["./src/**/*.{html,js,jsx,ts,tsx}"], //update with this
  theme: {
    extend: {},
  },
  plugins: []
}
Normally for custom projects I use Sass as a pre-processor. Since Tailwind is a PostCSS plugin, there’s nothing stopping you from using it with Sass or Less or whatever, but it’s not really necessary. If we’re going to use purely Tailwind then we will be writing little CSS anyway.
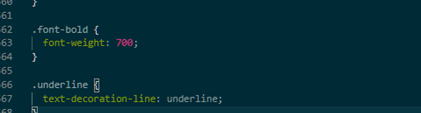
Open our Posts.tsx file, and update the H1 element with the following className:
<h1 className="font-bold underline">Attributes</h1>Next, open our (empty) index.css file in the src folder and enter the below:
@tailwind base;
@tailwind components;
@tailwind utilities;
Run the tailwindcss CLI tool to scan and build our CSS:
npx tailwindcss -i ./src/index.css -o ./wpTheme/dist/main.css This should create a main.css file in the wpTheme/dist/ folder – which you can open and check out. Open it and have a quick look at the bottom of the main.css file – you should see class definitions for the classes that you added to the Posts component, as below:
And you should see your WordPress site updated to look similar to the following:

Now, lets add this build script to our dev script in our package.json file:
  "scripts": {
    "start": "docker-compose up -d && npm run build-dev && npm run dev",
    "stop": "docker stop db wordpress phpmyadmin wordpress-cli",
    "remove": "docker rm db wordpress phpmyadmin wordpress-cli",
    "build-prod": "webpack --env production",
    "build-dev": "webpack --env development --watch",
    "build-css": "npx tailwind -i ./src/index.css -o ./wpTheme/dist/main.css --watch", // added this
    "dev": "start http://localhost:3000/ ",
    "test": "test"
  },
I’ve added the –watch flag to it as we want it to rebuild as we add classes to our application. However this causes a bit of a problem. Tailwind requires a separate terminal / process to couple to in order to watch files, and so does webpack. From what I’ve read Tailwind doesn’t work too well with WordPress, but we’re already into setting this project up so lets progress anyway! As I said, I normally just use SCSS and custom build my css… lol.
Let’s create another script for watching css – it will be exactly the same, just with the –watch flag as per below:
"build-css": "npx tailwind -i ./src/index.css -o ./wpTheme/dist/main.css",
"watch-css": "npx tailwind -i ./src/index.css -o ./wpTheme/dist/main.css --watch",
And add this build-css to our start script as follows:
"scripts": {
    "start": "docker-compose up -d && npm run dev && npm run build-css && npm run build-dev",
Now when we start, the main.js and main.css will be created for the application. One problem with this. We have clean set to ‘true’ in our output section of webpack.config.js. This means that our CSS is actually being cleaned / removed during this process. To avoid this we can move JS & CSS output into separate directories to ensure Webpack only cleans the JS output, but for now let’s just update our webpack.config.js file to prevent this from happening so we can move on. In webpack.config.js update this part:
output: {
      filename: 'main.js',
      path: !!env.production ? path.resolve(__dirname, './dist') : path.resolve(__dirname, './wpTheme/dist'),
      clean: false // true to false
    }
For the purpose of this tutorial, we are just going to open a separate command line terminal in VSCode and run ‘npm run watch-css’ and this will open a tailwind process that will watch for changes and rebuild our css. Do this now.
Now to test this, let’s just update a couple of things and watch for the changes.
Back in our Posts.tsx file, remove the class names from our H1 element and save:
<h1 className="">Attributes</h1>You should see both webpack compile and reload the browser, and our CSS get rebuilt. Open the browser to your localhost front page – and inspect the H1 element. You should see the classes being added & removed as you add remove them from Posts.tsx. However, what you should notice is that the classes are added by Tailwind to your dist/main.css file when you add them in, but they won’t be deleted when you remove the class. This isn’t a bug – it’s rather a deliberate performance optimization that drastically increases the speed of incremental rebuilds, especially in large projects. Thus, it is recommended to always compile your CSS in a one-off build for production so that you can remove these classes and minify the output.
If you ever want Tailwind to rebuild the CSS completely from scratch while in watch mode, just open your tailwind.config.js file or your CSS input file and save either of them (regardless of whether there are changes or not) – this will invalidate any caches and trigger a fresh rebuild.
I’m going to be honest, when I first watched this I thought it was a bug ang spent about 15mins Googling what was wrong before actually… Just. Reading. The. Documentation.
Tailwind UI is more like a set of blueprints, patterns, and ideas than a rigid UI kit. The code you end up with at the end of the day is yours, and you can factor it however you like. As Tailwind is a utility-first CSS framework, it might look like a dogs breakfast in your HTML, but it’s actually much easier to maintain than a large CSS codebase. It depends on how you want to work however – some people prefer extracting CSS away for separate components and then compiling, but this is also a fairly viable alternative.
Lets add some styles to our Posts to make it look presentable, and then we can move on. I discovered at this point that there were a bunch of tailwincss components out there, but you had to pay for them to get access. Sigh. However, I found a good site with pre-defined tailwind components and code examples to use, so I’ve used examples from there (https://tailblocks.cc/ if you want to check it out). For more specific styling, I really recommend dedicating some time to going through the tailwind docs: https://tailwindcss.com/docs
Anyway, lets update our Posts.tsx file as per below:
import React from 'react';
import useFetchData from '../../hooks/useFetch';

const Posts = () => {
  const { data, isLoading } = useFetchData('/wp-json/wp/v2/attributes');

  return (
    <React.Fragment>
      <div id="frontPagePosts" className="container px-5 py-24 mx-auto">
        <h1 className="sm:text-3xl text-2xl font-medium title-font text-center text-gray-900 mb-20">Attributes</h1>
        {isLoading ? (
          <p>Loading...</p>
        ) : (
          <div className="flex flex-wrap">

          {data?.map((post, index) => (

            <div className="m-3 min-w-full p-4 md:w-1/3 flex rounded  border-1 border-slate-50 border-solid shadow group hover:bg-black " key={index}>
              <div className="w-12 h-12 inline-flex items-center justify-center rounded-full bg-red-100 text-red-500 mb-4 flex-shrink-0">
                <svg fill="none" stroke="currentColor" strokeLinecap="round" strokeLinejoin="round" strokeWidth="2" className="w-6 h-6" viewBox="0 0 24 24">
                  <path d="M22 12h-4l-3 9L9 3l-3 9H2"></path>
                </svg>
              </div>
              <div className="flex-grow pl-6">
                <h2 className="text-gray-900 text-lg title-font font-medium mb-2 group-hover:text-white"  dangerouslySetInnerHTML={{__html: post.title.rendered}} />
              </div>
            </div>
          ))}
          </div>
        )}
      </div>
    </React.Fragment>
  );
};

export default Posts;
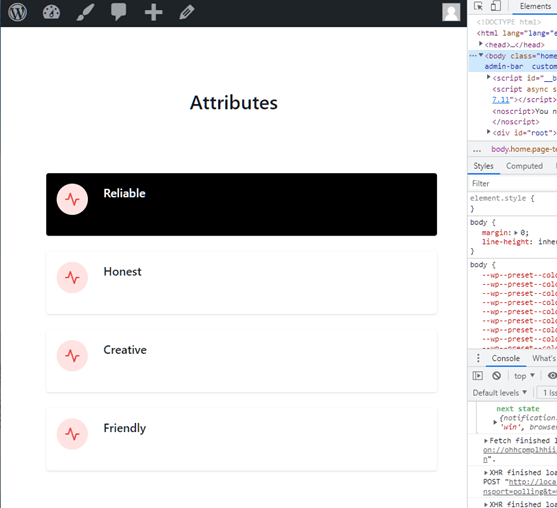
We should now see something like this in our browser: With the top element being the hover state (screenshot taken while mouse hover is in effect).
Ok, that’s enough of an intro to Tailwind for now. It still looks like a bit of a mess design-wise, but the outcome from this tutorial is not to have a fully working and functioning site – it’s to have the environment setup so that we can use it as a base for theme development moving forwards.
GraphQL
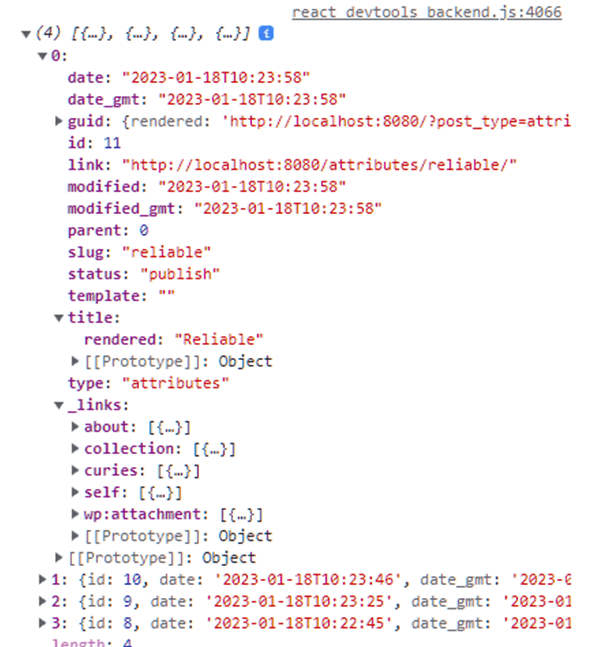
Now I think most of you would agree that querying the WordPress posts, and getting back all that information just to render the title of the post is a bit overkill. If we console.log out the data of the Posts.tsx file, then we can see all the WordPress data that is returned when we make this API call:
To “solve” this, we’re going to look at using GraphQL. I asked our friend ChatGPT to explain what GraphQL is, in laymans terms and it returned the below:
“GraphQL is a query language for APIs (Application Programming Interfaces) that allows clients to request specific data from a server, rather than a fixed set of endpoints. It allows clients to specify exactly what data they need, and the server will return only that data. This allows for more efficient data retrieval and can reduce the amount of data transferred over the network. Sounds perfect for what we are doing! Lets get started.”
npm i graphql @apollo/react-hooks --saveNow we just need a schema that defines the query type, and we need an API root with a function called a ‘resolver’ for each API endpoint.
For shortcutting purposes, there is a WP plugin (WPGraphQL) that you can use in your sites enables the GraphQL server. This can be viewed here: https://github.com/wp-graphql/wp-graphql
The WPGraphQL plugin doesn’t ship with WordPress Core, but it does add a GraphQL endpoint to WordPress. GraphQL is what we use to get the data – mostly due to its ease of use and ability to get with singular queries what the REST API would take multiple queries to get.
Apollo on the other hand is a library for making GraphQL requests, so we will bundle that into our theme development – we will use this later.
So, to get setup with GraphQL in WordPress, we’re going to install the WPGraphQL plugin. Go to plugins in your WordPress site, go ‘Add new’ and then search for ‘GraphQL’ and then install WPGraphQL & activate it.
Now, go to the GraphQL plugin settings in WordPress and check them out:
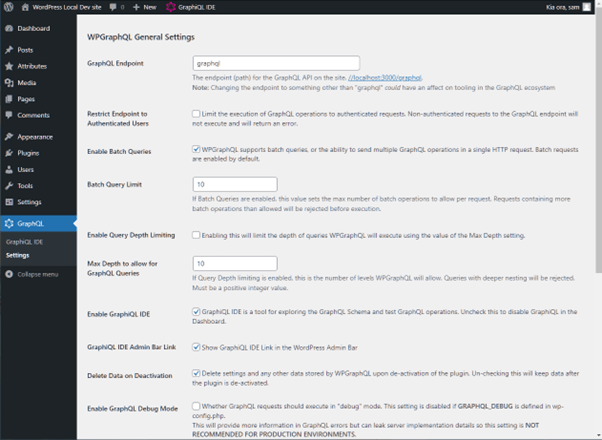
You should see your endpoint to query here: (in this screenshot it’s //localhost:3000/graphql) – feel free to leave it this way, or change it if you want it to be something different. For now, I’m going to leave it as is. If you want, you can also enable debug mode or tracing to help if you have any further issues. Again, for now I’m going to leave it as is. WordPress data can now be accessed using GraphQL queries – you can test this out using any HTTP client like Postman or similar, or you can use the IDE that comes with the GraphQL plugin.

You can test queries here and see the results in realtime. Click on Query Composer, and you should see a pre-defined list of items to query. Use the below query:
query {
  posts {
    nodes {
      title
      id
    }
  }
}
You should see a result like this:
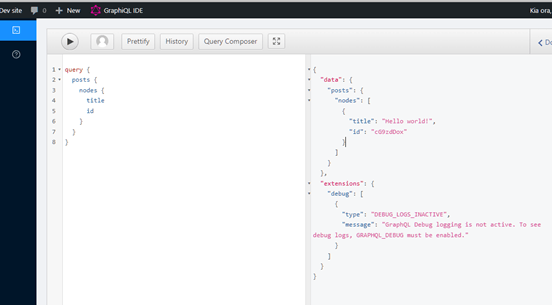
This is the default dummy “Hello World” post that WordPress automatically creates upon installing. If you wanted to create more posts, and then try running the same query, then you will see them in the query results too.
There’s one more step if we want to use this with our custom post types however. Go back to your functions.php file where we defined the custom post type, and update it using the below code, added to the $args array:
$args = array(
        ...
        'show_in_graphql'     => true, // new line
        'graphql_single_name' => 'attribute', // new line
        'graphql_plural_name' => 'attributes', // new line
      );
There’s more info here (https://www.wpgraphql.com/docs/custom-post-types) on using WPGraphQL with custom post types, which details other parameters you can use if you need them.
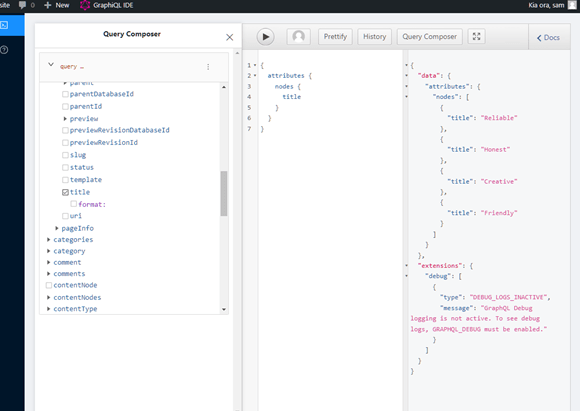
If we jump back into the GraphQL IDE, we can now use the below query
{
  attributes {
    nodes {
      title
    }
  }
}
And we should see something like this:
Now we’re all set to start using this in our theme!
(Optional) Before we jump into the component development, let’s add a warning to our theme to let future authors know that we need the WPGraphQL plugin to function. Open your functions.php file, and copy in the below code (thanks https://dhali.com/wordpress/wordpress-required-plugins/):
add_action('admin_notices', 'showAdminMessages');

function showAdminMessages() {
  $plugin_messages = array();

  include_once( ABSPATH . 'wp-admin/includes/plugin.php' );

  // WPGraphQL Plugin
  if(!is_plugin_active( 'wp-graphql/wp-graphql.php' ))  {
    $plugin_messages[] = 'This theme requires you to install the WPGraphQL plugin, <a href="https://www.wpgraphql.com/" target="_blank">download it from here</a>.';
  }

  if(count($plugin_messages) > 0) {
    echo '<div id="message" class="error">';

      foreach($plugin_messages as $message) {
        echo '<p><strong>'.$message.'</strong></p>';
      }

    echo '</div>';
  }
}
Now when you install and activate the theme – you should see this in your dashboard if you don’t have the WPGraphQL plugin installed:

This won’t appear once the plugin has been installed.
Now, we are going to update our React App to use this query, and display them on the page in the same way. In our sec/index.tsx file, we are going to setup an Apollo client. You might have previously used Apollo-Boost but this is the more modern way of doing this.
From the Apollo GraphQL docs (https://www.apollographql.com/docs/react) – using v3: Apollo Client is a comprehensive state management library for JavaScript that enables you to manage both local and remote data with GraphQL. Use it to fetch, cache and modify application data, all while automatically updating your UI.
It’s designed for modern React (to use hooks, etc), has declarative data fetching, and provides an excellent developer experience.
Lets get started using the below command:
npm i @apollo/client --saveThis package contains everything you need to setup the Apollo Client, including state management, in-memory cache, error handling and a React-based view layer.
In our app.tsx file, let’s add the below code:
import React from 'react';
import { createRoot } from 'react-dom/client';
import { ApolloClient, InMemoryCache, ApolloProvider, gql } from '@apollo/client'; // add this line
Next, we’ll initialize ApolloClient, passing its constructor a configuration object with the uri and cache fields:
const client = new ApolloClient({
  uri: '/graphql',
  cache: new InMemoryCache(),
});
Here, the uri specifies the URL of our GraphQL server, and cache is an instance of InMemoryCache which ApolloClient uses to cache query results after fetching them.
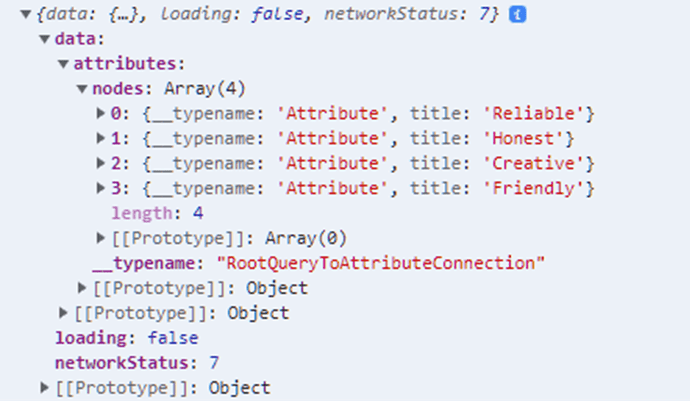
Lets test the same query we were using before by simply using console.log – back in app.tsx, call client.query() with the query string wrapped in the gql template literal as shown:
client
  .query({
    query: gql`
      query NewQuery {
        attributes {
          nodes {
            title
          }
        }
      }
    `,
  })
  .then((result) => console.log(result));
Back in our app, we should see something like the below logged to the console:
Lets arrange our files a bit better. Create a new file called apollo.ts in the /src directory, and add this code to it:
import { ApolloClient, InMemoryCache } from '@apollo/client';

const client = new ApolloClient({
  uri: '/graphql',
  cache: new InMemoryCache(),
});

export default client;
Now back in our app.tsx file, we can remove the query & console.log() statement, and gql from our imports, and import the client from our apollo.ts file. App.tsx should look like this:
import React from 'react';
import Posts from './components/Posts/Posts';
import client from './apollo';
import { ApolloProvider } from '@apollo/client';

const App = () => {
  return (
    //@ts-ignore
    <ApolloProvider client={client}>
      <Posts />
    </ApolloProvider>
  );
}

export default App;
Cool, so that’s working – now let’s update out application to utilise this. In our hooks folder, lets create a new file called graphquery.ts, and add the below code to it:
import { gql } from "@apollo/client";

export const GET_ALL_ATTRIBUTES = gql`
      query NewQuery {
        attributes {
          nodes {
            title
          }
        }
      }
    `;
Here, we format our GraphQL query for the useQuery hook. Now back in Posts.tsx, lets comment out our useFetchData import and our destructured data & isLoading from using useFetchData.
Let’s update Posts.tsx with the below code to look like this:
import { useQuery } from '@apollo/client/react';
import React from 'react';
import { GET_ALL_ATTRIBUTES } from '../../hooks/graphquery';
//import useFetchData from '../../hooks/useFetch';

const Posts = () => {
  //const { data, isLoading } = useFetchData('/wp-json/wp/v2/attributes');
  const { loading, error, data } = useQuery(GET_ALL_ATTRIBUTES);
  const attributesFound = Boolean(data?.attributes);

  return (
    <React.Fragment>
      <div id="frontPagePosts" className="container px-5 py-24 mx-auto">
        <h1 className="sm:text-3xl text-2xl font-medium title-font text-center text-gray-900 mb-20">Attributes</h1>

        {loading ? (
          <p>Loading...</p>
        ) : error ? (
          <p>Error: {error.message}</p>
        ) : !attributesFound ? (
          <p>Attributes cound not be found</p>
        ) : (
          <div className="flex flex-wrap">

          {data.attributes.nodes?.map((attribute: any, index: any) => (

            <div className="m-3 min-w-full p-4 md:w-1/3 flex rounded  border-1 border-slate-50 border-solid shadow group hover:bg-black " key={index}>
              <div className="w-12 h-12 inline-flex items-center justify-center rounded-full bg-red-100 text-red-500 mb-4 flex-shrink-0">
                <svg fill="none" stroke="currentColor" strokeLinecap="round" strokeLinejoin="round" strokeWidth="2" className="w-6 h-6" viewBox="0 0 24 24">
                  <path d="M22 12h-4l-3 9L9 3l-3 9H2"></path>
                </svg>
              </div>
              <div className="flex-grow pl-6">
                <h2 className="text-gray-900 text-lg title-font font-medium mb-2 group-hover:text-white"  dangerouslySetInnerHTML={{__html: attribute.title}} />
              </div>
            </div>
          ))}
          </div>
        )}
      </div>
    </React.Fragment>
  );
};

export default Posts;
Last bit of tidy up (not needed, I’m just being pedantic!), lets break this down a little bit further. Update the Posts folder to Attributes. Update Posts.tsx to AttributesContainer.tsx, and update it to be as per below:
import { useQuery } from '@apollo/client/react';
import React from 'react';
import { GET_ALL_ATTRIBUTES } from '../../hooks/graphquery';
import Attribute from './Attribute'

const AttributesContainer = () => {
  const { loading, error, data } = useQuery(GET_ALL_ATTRIBUTES);
  const attributesFound = Boolean(data?.attributes);

  return (
    <React.Fragment>
      <div id="frontPagePosts" className="container px-5 py-24 mx-auto">
        <h1 className="sm:text-3xl text-2xl font-medium title-font text-center text-gray-900 mb-20">Attributes</h1>

        {loading ? (
          <p>Loading...</p>
        ) : error ? (
          <p>Error: {error.message}</p>
        ) : !attributesFound ? (
          <p>Attributes cound not be found</p>
        ) : (
          <div className="flex flex-wrap">

            {data.attributes.nodes?.map((attribute: any, index: number) => (

              <Attribute title={attribute.title} key={index} />

            ))}
          </div>
        )}
      </div>
    </React.Fragment>
  );
};

export default AttributesContainer;
We can remove the comments, and we can also remove the useFetch.ts hook file that we created earlier as we are going to use the graphquery instead.
Update app.tsx as per below:
import React from 'react';
import AttributesContainer from './components/Attributes/AttributesContainer';
import client from './apollo';
import { ApolloProvider } from '@apollo/client';

const App = () => {
  return (
    //@ts-ignore
    <ApolloProvider client={client}>
      <AttributesContainer />
    </ApolloProvider>
  );
}

export default App;
And lastly, let’s add an Attribute.tsx file to the Attributes folder, and add the below code to it:
import React from 'react';

interface Attribute {
  title: string;
  key: number;
}

const Attribute = (props: Attribute) => {

  return (
    <React.Fragment>
      <div className="m-3 min-w-full p-4 md:w-1/3 flex rounded  border-1 border-slate-50 border-solid shadow group hover:bg-black " >
        <div className="w-12 h-12 inline-flex items-center justify-center rounded-full bg-red-100 text-red-500 mb-4 flex-shrink-0">
          <svg fill="none" stroke="currentColor" strokeLinecap="round" strokeLinejoin="round" strokeWidth="2" className="w-6 h-6" viewBox="0 0 24 24">
            <path d="M22 12h-4l-3 9L9 3l-3 9H2"></path>
          </svg>
        </div>
        <div className="flex-grow pl-6">
          <h2 className="text-gray-900 text-lg title-font font-medium mb-2 group-hover:text-white"  dangerouslySetInnerHTML={{__html: props.title}} />
        </div>
      </div>
    </React.Fragment>
  );
};

export default Attribute;
We now have separation between the container for the attributes, and the attributes as a simple reusable component.
The last thing I want to do here now is add & configure some simple tests. There are a few ways to test React components, but (as per reactjs.org docs) they are broadly divided into two categories:
- Rendering component trees in a simplified test environment and asserting on their output
- Running a complete app in a realistic browser environment
We’re going to look at the recommended tools here that I’ve had experience using – Jest & Enzyme. Writing out test cases and covering all the main scenarios gives us confidence that the application will work fine in production. It makes the application more robust, and less error-prone. We aren’t going to be testing things like variable and function names – only the details that the end user cares about.
Jest & Babel
Jest is a test runner that creates snapshots when we run our file. To get our tests up and running, we can setup Jest by below:
npm i jest --save-devNow in our package.json file, update our test script as per below:
  "scripts": {
    ...
    "test": "jest"
  },
Now we generate a basic configuration file by using the below command:
jest --initSelect the following options when prompted:

We are going to use Babel, so lets install the required dependancies:
npm i babel-jest @babel-core @babel/preset-env --save-devNow configure Babel to target your current version of Node by creating a babel.config.js file in the root of your project, and add the below to it:
module.exports = {
  presets: [['@babel/preset-env', {targets: {node: 'current'}}]],
};
Please note:
babel-jest is automatically installed when installing Jest and will automatically transform files if a babel configuration exists in your project. To avoid this behaviour, you can explicitly reset the transform configuration option:
module.exports = {
  transform: {},
};
Jest also supports TypeScript via Babel. After installing Babel & dependencies from above, install the relevant dependencies for TypeScript:
npm i --save-dev @babel/preset-typescriptThen add @babel/preset-typescript to the list of presets in your babel.config.js. It should look like this:
module.exports = {
  presets: [
    ['@babel/preset-env', {targets: {node: 'current'}}],
    '@babel/preset-typescript',
  ],
};
There are still some caveats to using TypeScript with Babel. Because TypeScript support in Babel is purely transpilation, Jest will not type-check your tests as they are run. If you want that, you can use ts-jest instead or just run the TypeScript compiler ‘tsc’ separately (or as part of your build process).
It’s at this stage that I used the ‘tsc’ command, and noticed that TypeScript (tsc) wasn’t ignoring my node_modules folder, so I had to update my tsconfig.json file as per below:
  "exclude": [
    "node_modules",
    "./node_modules",
    "./node_modules/*",
    "./node_modules/@types/node/index.d.ts",
  ]
And add this below option to the compilerOptions:
"types": []This might help someone, but it’s not necessary for our project – I just went off track a bit. By default all visible “@types“ packages are included in the compilation, including packages in node_modules/@types of any enclosing folder. We specify “types”: [] to disable automatic inclusion of @types packages.
At this stage, we now have a fully working WordPress theme utilising GraphQL, React & Tailwind, that’s spun up in a Docker Container for local development.
You can view or pull down the repository below to get started. It’s a pretty blank canvas, but should be a really good starting point for your next WordPress / React project.
https://github.com/Cactusman07/wordpress-react-theme-development
As always, if you need help or ask questions, or simply want to chat – please reach out to me the contact form here, or via hello@sammuir.co.nz
Happy Coding!
Sam